Sunday, July 28, 2013

DIY Scrapbook Paper on Wood letter

DIY scrapbook paper on wood letter. It is so simple to do and cheap to make. I love cheap crafts!! You can create so many different styles with all the varieties of wood letters and scrapbook paper.


What you will need:
Scrapbook paper
Wood letter
Mod Podge
Paint for the sides*
X-acto Knife*
*Optional 


1. This step is optional. Paint the sides of your wood letter. 


2. Turn your scrapbook paper and wood letter over. Align the letter on the paper. Your letter should be backwards at this point! Trace your letter and cut it out.


3. Turn your letter and paper back over to their right sides. Apply a generous amount of Mod Podge on your wood letter. Put your scrapbook paper on the letter, and press out any air bubbles. 


4. Allow that to dry for a couple of minutes, and apply a coat or two of Mod Podge to the letter. 


Thursday, July 25, 2013

DIY Sequin Letter


Things you will need:

Large sequins (mine came in a pack of silver and gold from Michael's)
Elmer's glue
Wood letter (Jo-ann)
paint for sides (optional)

1. Put 2 or more coats of paint on the side of your letter. I wanted mine to be bright and to pop. So I used the color spearmint by craft smart. I think I got it from Michael's. This step is optional and you can leave it the color of your letter.


2. Once the paint has dried, take your glue and put a line all the way across the bottom of your letter. 


3. Start placing the sequins on the glue. Slightly coving the last one (refer to the picture if that part is confusing!!) Once that row is done, apply glue right above those sequins. Adding more if you think it's necessary. 


4. Allow to dry completely. Then hang on the wall!  


** Update: August 16 2013. Use a different glue. Hot glue works well. I have had to glue a couple sequins back on! Mine hang over the edge making it difficult to pick up the letter! The sequins just pop off if you don't hold it just right! If your sequins do not go over the edge of your letter you will be fine using the Elmer's glue.


Friday, July 19, 2013

Easy Quinoa Bake

Easy Quinoa bake
I recently discovered how much I enjoy Quinoa. I found this quick and easy recipe here. I didn't have some of the ingredients so I changed a couple of the things to what I knew I had. It turned out really good. A little spicy from the rotel but still really tasty. 


Ingredients
1 cup quinoa 
2 eggs
2 cans black beans
1 can corn
2 cans of chicken
1 cup of shredded cheese 
1 can diced tomatoes 
1 can rotel
1 tbs cumin
salt and pepper
large bowl
medium sized bowl
9x13 pan lightly sprayed with non stick cooking spray

1. preheat oven to 350°. Rinse 1 cup of quinoa throughly in a fine mesh strainer. Place quinoa in a sauce pan with 2 cups of water. Bring to a boil then turn the heat down to a simmer. Cook for 15 to 30 minutes or until all the water is absorbed.


2. In the large mixing bowl combine cooked quinoa, black beans, chicken, cumin, salt, and pepper.

3. In the medium bowl mix can of diced tomatoes, rotel, and eggs till well combined. Add the mixture to the large bowl and stir well. 


4. Place in lightly greased pan. Sprinkle shredded cheese (I added a little more than 1 cup.) on top. Bake uncovered for about 30 to 35 minutes. 


Thursday, July 18, 2013

Homemade ice cream in a bag

A fun treat for all ages on a hot summer day!!


Materials needed:
1 gallon ziploc bag
1 quart ziploc bag
ice
1/2 cups rock salt
1 cup half and half
2 tbs sugar
1/2 tsp vanilla extract
favorite toppings
bowls (optional)

Step 1: Fill gallon bag half way with ice. Then add rock salt to the gallon bag.


Step 2: Pour half and half, sugar, and vanilla into quart bag. Make sure it is sealed tightly.


Step 3: Place quart bag in gallon bag. Seal gallon bag tightly and begin to shake bag for 5 to 7 minutes, or until the mixture hardens. (you can eat it straight from the bag, but i found these bowls at joann on clearance. They were too cute to pass up!!)


Step 4: Add your favorite toppings and enjoy!


*note: one of our gallon bags tore so it might be better to double your gallon bags. Just to make sure yours does not rip.

Tuesday, July 16, 2013

Ombre watercolor initial

DIY Ombre watercolor Initial


Materials needed
picture frame 
paint for frame (I used delta creative ceramcoat in Laguna blue)
watercolors (michael's)
watercolor paper (michael's) 
paint brush
cup of water
vinyl letter stickers (mine are 3 inches from hobby lobby)
antiquing glaze (lowes)
foam brush
damp paper towels 


Step 1: Apply two coats of paint to your picture frame and allow to completely dry. 


Step 2: This step is optional. Take a foam brush and dip into the antiquing glaze. Apply one side at a time. Once you have the side covered, take a damp paper towel and wipe the excess off. You do not want the glaze to cover the whole frame. Once dry it is hard to remove the glaze. Apply as many times till you get your desired look. 


(here is a better picture of the antiquing glaze.)

Step 3: Put your vinyl letter sticker on your paper. (*please don't look at how awfully off center and crooked my L is!!) Make sure to press out all the air bubbles. Get your watercolor(s) ready. Dip your paint brush into the water then into the color of your choosing. Swirl in the paint to fully coat the paint brush. The color will be dark at this point. 


(here is a better picture of the watercolor paper)


Step 4: Apply the watercolor to the paper. If the color is too dark, dip your paint brush into the cup of water then back to your paper. This process will dilute the color toning it down a little. 

Step 5: Continue step 4 but as you work up the paper slowly make the colors lighter. You are going from a very dark color to white to get the ombre effect.


Step 6: Allow to dry for 20 to 30 minutes. Then peel the vinyl sticker off. Once your frame is dry you can place the paper in the frame! 


Monday, July 15, 2013

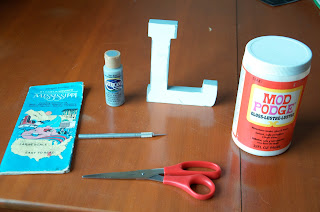
Map of hometown on Initial

How to put a map of your hometown on a initial! 

Materials you will need: 


Map (mine is from circa 1988!!) 
Paint for the sides* it is optional  
X-acto knife to trim the sides
Scissors 
Wood letter (I got mine from Jo-ann)
Mod podge 


Step 1: Paint the sides of your wood letter. (This step is optional.) I used Slate Grey by Americana 


Step 2: Flip you map and wood letter over so the side you want to use is face down. Your wood letter should be backwards at this point. 

Step 3: Align your letter on the paper. I want a specific area of the map on my letter. If that is the same for you double check to make sure your letter matches up before you cut!!


Step 4: Once you have cut out the shape, flip your paper and letter back over. Take mod podge and apply a generous amount on the letter. Work quickly because the mod podge dries quickly.

Step 5: Place your paper over the wood letter and press all the air bubbles out. Let that dry for a couple of minutes


Step 6: Lastly, apply a couple thin coats of mod podge on the top of your letter.