Monday, December 9, 2013

Cute JOY craft

Cute and Easy JOY Christmas craft


What you will need:
J and Y Wood Letters
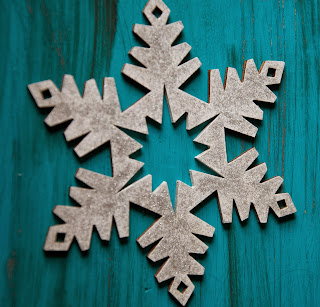
Snow Flake Ornament
White paint
Blue Paint
Glitter Paint
Small Piece of cardboard 
Hot Glue


Step 1: Paint your J and Y letters blue. I put a couple of coats on mine. I didn't paint the back of mine because you can't see the back where I am putting it.  


Step 2. Paint your snowflake white then with the glitter paint. This step took a while because of all the detail. I did a couple of coats of the white and glitter too. 


Step 3. Once your letter and snowflake are dry you are going to hot glue the J, snowflake, and Y together. Then you will put a little glue on the bottom of your letters and glue that to the piece of cardboard. I cut out a small piece from a paper mache T that I had from a previous project. If you get bigger letters they might stand up fine on their own but mine would not. I didn't paint my cardboard because it's higher up and you can't see it.


Monday, November 25, 2013

DIY Snow Globes


This project is a great alternative to snow globes with water. I have seen these the past couple of years and just never got around to making some! It was super easy and only took about 10 minutes to make too! You can use any empty jars you have around the house. We had an empty salsa jar and I cant remember what the small jar is. The possibilities are endless!! 


What you will need:
Jars With Lid (any kind work!)
Fake Snow
Little Trees (Michael's)
Hot Glue

Step 1: Wash your jars and remove any labels. Center your tree in the middle of the lid. Hot glue your tree down. 


Step 2: While the glue is drying, put some of the fake snow in the bottom of the jar. I just put enough to cover the bottom. You can always add more if necessary. 


Step 3: Once the glue has dried, screw the top on the jar and shake it a few times to get the snow scattered around. Set up and enjoy!


Thursday, November 14, 2013

Glitter Ornament


Christmas is my favorite time of year. I start celebrating Christmas a lot earlier than I probably should!! But that doesn't stop me! I am so excited to get
 started on all my Christmas crafts for this year. I am so thankful for starting this blog so I can go back and see what I made without having to get all the decorations down! I made some stuff for my mantel last year and I can not remember anything that I made for it. That is sad!! 


What you will need: 
Pledge Floor Care  
Plastic or Glass Clear Ornament (Michael's, Joann) 
Glitter

Step 1: Take the top off your ornament. Be careful to not bend the top.


Step 2: Squirt a small amount of pledge floor care in the ornament. Sounds crazy but the pledge acts as your glue to keep the glitter in place and it dries clear! 
Do not shake the ornament as it will create bubbles!! Just gently swirl the ornament around making sure you cover everything. Pour the rest back in the bottle. 
I turned my ornament as I poured the liquid back in the bottle to make sure I covered the very top. You don't see that part once you put the top back on though. 
Just a personal preference. You will want to work quickly on steps 2 and 3 so it doesn't dry.


Step 3: Now the glitter!! I made a funnel from a piece of paper but if you have a funnel on hand that works too! Pour more glitter than you think in the ornament. 
Now start to slowly spin the ornament to cover the inside with the glitter. Go over places a few times just to make sure you don't miss anything! 
The tricky part is getting the glitter back in the bottle if you are using a small bottle of glitter like I am. That is when the paper comes in handy because you can form it to fit in the bottle. Now pour your excess glitter back in the bottle.
 Pop the top back in your ornament and put on your tree to enjoy!! 


Monday, October 21, 2013

DIY Wood Pumpkins


What you will need:
4-1x4 blocks cut to 6 inches
4-1x4 blocks cut into 7 inches
4-1x4 blocks cut into 8 inches
1 inch blocks
Brown paint
Orange paint
Hot glue
Sand paper (optional)

Step 1: Cut out all of your wood blocks and lightly sand the sides. Sanding is just an option. 

Step 2: Get all of your 6 inch blocks and glue them together. Paint the outside and top. I didn't paint the backs of mine. Some spots I had to go over a couple of times with paint, but mainly I did 2 coats of paint. 


Step 3: Take two 7 inch and two 8 inch boards. Start with a 7 inch board then put the two 8 inch in the middle, and end with a 7 inch board. So it should be 7 inch 8 inch 8 inch 7 inch.  Try to center your 7 inch boards on your 8 inch boards and glue those together . It does not have to be perfect! Paint those a couple of times, going over some spots more if needed.

Step 4: Repeat step 3 again with the last 7 inch and 8 inch boards. 


Step 5: Take 2 blocks and glue them together then glue one in the center. I did that twice and then just glued two together. Tried to change it up a little! Paint those brown, like with the pumpkins I did not paint the backs. They wont be seen where I am going to put them. 


Step 6: Take your 6 Inch pumpkin and glue one of the three blocks on top in the center. Again it doesn't have to be perfect! Take one of the 7 inch and 8 inch ones and lay it on its side. Glue the last 3 block topper in the center. Take the last pumpkin and glue the 2 blocks  on the top in the center. You can do the three block combo on all of them. I was just changing it up a little bit. 


Friday, October 18, 2013

DIY Halloween fabric wreath


I made myself one of these wreaths last year and when I got my fabric, I got too much. So I thought I would make another wreath this year and try to sell it. Why not right! Funny thing is I ran out of one of the fabrics and they did not have the same one again this year! So I bought a similar one and just added the new fabric around the wreath to help blend it in. This project took me about two days. Your fingers will start to hurt from putting the fabric though the wreath and tying it but it is so worth it. 

Things you will need:
12" wire wreath (you can go bigger but you
 will need a little more fabric)
Floral wire (I used 16 gauge and that was a little too thick 
so I would say 20- 26 gauge will be fine)
Wood letters
Scissors
Hot glue
Green paint
Glitter paint
3-5 different fabric choices (Depending on how many different 
fabrics you choose will determine how much fabric you need.
 If you only find 3 that you like then get half of a yard to make
 sure you have enough. If you find 4 or 5 
different fabrics you could use less.)


Step 1: What I did was cut my fabric into about 5 inch long strips then cut 1 inch strips out of those. It doesn't have to be perfect. 

Step 2: Weave a strip of fabric through one of the sections on the wire wreath and double knot it. So that way it shouldn't unravel.


(Step 1 and 2 take a while so I watched tv while I did those!!)

Step 3: Paint your wood letters green. I did about two coats on mine. When they are completely dry, do several coats of the glitter. I like this stuff because it doesn't fall off! 

Step 4: Place your letters on your wreath to see where you need to glue the wire. Cut your wire to 5 to 7 inch long. Give or take. Bend the wire to make it kinda flat in the middle and hot glue that to your wood letter. I did 2 sets of wire for each letter. 


Step 5: Once the glue is dry, wiggle your wire through the fabrics and twist your wire to attach it to the wreath. Cut any extra wire off the ends. I took some pliers and bent the wire down so it would not poke anyone. 
* I couldn't wiggle the wire and take pictures!
* It's hard to see but if you look closely you can see the green wire.

Tuesday, October 1, 2013

Oh The Places You'll Go


This is one of my favorite Dr. Seuss books. I love to travel and explore this huge world we live in. I haven't gone many places, but I cherish all those trips I have been able to go on so far. I want to visit every state in the US at least once. I want to go to so many more places that it would take forever to name. I am so excited to see this project grow and watch the map fill up with tiny pins. 


What you will need:
Frame 
(mine is a poster frame from Michael's. 
It was on clearance for 6 dollars. It's cheap. 
I don't recommend it!!)
Cork Sheet (Michael's $15)
Map 
Elmer's Glue
Hot glue

Step 1. Take your picture frame apart and get rid of the glass piece or in my case plastic piece. 

Step 2. My frame is a little bigger than my map so I took the "picture" that they put in in frames and glued my map to that. Now it has a black boarder around it. I used a glue stick because that doesn't wrinkle as bad as the liquid Elmer's glue does.

Step 3. Measure and cut your cork to fit the back piece of your frame. Trim if necessary. I put the back piece in the frame and marked where the inside corners met the board. You want to make sure that when you glue your cork to the back piece, you can still get in in the frame. I glued the cork piece down with the hot glue.


Step 4. Glue your map to the cork. Check the back of the frame to see where the hook are. You don't want to glue it upside down! I used Elmer's glue just around the side. Elmer's glue tends to wrinkle the paper when it dries so I did it just on the black trying to hide it.

6. Put your map back in the frame and secure the back pieces to make sure it wont come out of the frame. Pin all the places you have been. Hang on the wall and enjoy!

Wednesday, September 25, 2013

Heart Curtain


This cute heart curtain brings back memories of my old bead curtain I use to have hanging from my door many many years ago!


What you will need:
Paper
Scissors
Fishing line
Tape 
Ribbon - Optional

Step 1. Make your shape. You could buy a punch but they can be pretty expensive and I didn't really need one, knowing I could just cut out the shapes. It would make this project go a lot faster though!! when creating my heart shape, I could get one side too look right but I could not mirror it. So I gave up and cheated a little! I took a square piece of paper about the size I wanted the heart to be and folded it in half. Drawing half of the heart starting by the crease. Cut it out and BAM equal heart! Make sure you draw and cut it on the crease side or you will have two separate half hearts!


Step 2. Trace your heart on a piece of paper. I used 5 different colors from a pack of paper I bought at Joann. I got about 16 on a piece of 8x11 paper. Cut those out and place them in piles.

Step 3. Measure out your fishing line. I cut mine about 60 inches long. If it is much longer you might have to cut out extra hearts to attach. 

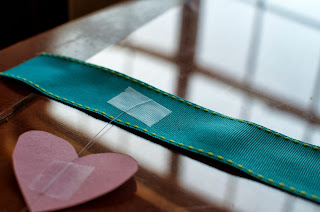
Step 4. Begin taping your hearts to the string. Place the string in the middle of your heart and tape. Super easy!

Step 5. This step is optional. I did this so I didn't have to tape all the separate strings to the door frame. Measure a piece of ribbon to fit the top of your door frame. Now just tape the string of hearts to the ribbon. When you hang the ribbon, make sure the side with the tape is facing the door frame. I only did 5 rows of hearts because I am going to add some streamers in between the hearts. You can make more rows of hearts if you don't want to add streamers. 

Monday, September 23, 2013

Happy Birthday Garland


*I cut my cousins name out of the picture. 
That is why you can see part of the 3rd row

Here are steps to make this cute birthday garland. 


What you will need:
Paper 
Ruler 
Scissors
X-acto knife
String or Yarn 
Single hole punch

Step 1. I am awful at drawing! I used a ruler and Google images to help draw the letters. I also cut out some triangles to look like little pendant flags. They are not perfect at all but they work and my soon to be 7 year old cousin will not care! 

Step 2. Carefully cut out your letters. Using the X-acto knife to cut out in insides of some letters. Punch holes in your letters, trying to get them around the same height on each letter. So that way some are not higher or lower than others.

Step 3. Put your letters on your string or yarn. When you are putting your letters and triangles on, you want to put the yarn of string through the front on the first hole and through the back on the second hole. I did this so you wouldn't see the string across the front of the letter or triangle. I used yarn and the ends tend to unravel when they are messed with too much, so I burnt the ends lightly.


*This is the back of the triangle. 

*front of the triangle

Step 4. Hang and enjoy!