Wednesday, September 25, 2013

Heart Curtain


This cute heart curtain brings back memories of my old bead curtain I use to have hanging from my door many many years ago!


What you will need:
Paper
Scissors
Fishing line
Tape 
Ribbon - Optional

Step 1. Make your shape. You could buy a punch but they can be pretty expensive and I didn't really need one, knowing I could just cut out the shapes. It would make this project go a lot faster though!! when creating my heart shape, I could get one side too look right but I could not mirror it. So I gave up and cheated a little! I took a square piece of paper about the size I wanted the heart to be and folded it in half. Drawing half of the heart starting by the crease. Cut it out and BAM equal heart! Make sure you draw and cut it on the crease side or you will have two separate half hearts!


Step 2. Trace your heart on a piece of paper. I used 5 different colors from a pack of paper I bought at Joann. I got about 16 on a piece of 8x11 paper. Cut those out and place them in piles.

Step 3. Measure out your fishing line. I cut mine about 60 inches long. If it is much longer you might have to cut out extra hearts to attach. 

Step 4. Begin taping your hearts to the string. Place the string in the middle of your heart and tape. Super easy!

Step 5. This step is optional. I did this so I didn't have to tape all the separate strings to the door frame. Measure a piece of ribbon to fit the top of your door frame. Now just tape the string of hearts to the ribbon. When you hang the ribbon, make sure the side with the tape is facing the door frame. I only did 5 rows of hearts because I am going to add some streamers in between the hearts. You can make more rows of hearts if you don't want to add streamers. 

Monday, September 23, 2013

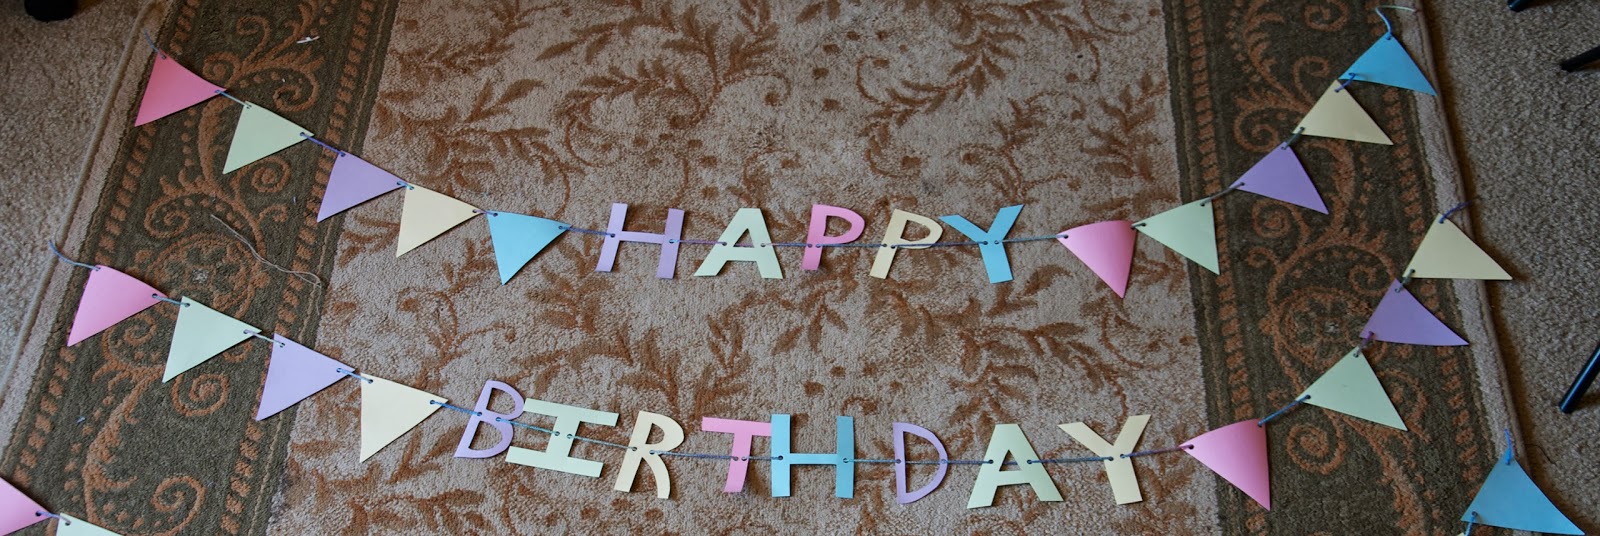
Happy Birthday Garland


*I cut my cousins name out of the picture. 
That is why you can see part of the 3rd row

Here are steps to make this cute birthday garland. 


What you will need:
Paper 
Ruler 
Scissors
X-acto knife
String or Yarn 
Single hole punch

Step 1. I am awful at drawing! I used a ruler and Google images to help draw the letters. I also cut out some triangles to look like little pendant flags. They are not perfect at all but they work and my soon to be 7 year old cousin will not care! 

Step 2. Carefully cut out your letters. Using the X-acto knife to cut out in insides of some letters. Punch holes in your letters, trying to get them around the same height on each letter. So that way some are not higher or lower than others.

Step 3. Put your letters on your string or yarn. When you are putting your letters and triangles on, you want to put the yarn of string through the front on the first hole and through the back on the second hole. I did this so you wouldn't see the string across the front of the letter or triangle. I used yarn and the ends tend to unravel when they are messed with too much, so I burnt the ends lightly.


*This is the back of the triangle. 

*front of the triangle

Step 4. Hang and enjoy!

Tuesday, September 17, 2013

Fabric Garland

A few easy steps to make this cute fabric garland. 


What you will need:
Fabric: I had a couple pieces left over from a previous project and I bought quilters bundle from joann. 
Scissors
Twine or Ribbon


Step 1: Measure your twine or ribbon to the length you need. Lay it out flat.

Step 2: Figure out how long you want your fabric to be. Then measure and cut. My strips are about 13.5 inches long and roughly 1 to 1.5 inches long, but you can make yours any length and width you want. I made a little guide on the bottom of my fabric. It doesn't have to be perfect and knowing I can't cut in a straight line, I have to be okay with that!!

 You can barely see the small lines

I might have gone over board with the fabric!!

Step 3: This step is a lot harder to explain by typing then it is to do! Take your fabric, fold it in half and lay it on top of the string. Take the ends of the fabric and fold them under the string and pull through the loop, then pull tight. 


Step 4: Continue until you get to the end. I left about 2 inches on the ends of mine. Hang up and enjoy. 


Wednesday, September 11, 2013

Initial Wall


I have this bare wall by my bed that was just so boring. It needed something on it but I could never figure out what should go there. I didn't really want a huge piece of art right there. I was on pintrest one day (I pretty much live on it!!) and I saw a post where they did something similar but used pictures and initials. I thought creating different L's would be fun and I could also get creative with it. Budget wise, I am not sure what my total cost was, but it isn't extreme. Beware because the total price can sneak up on you and then you have spent way more than you wanted. You can get a bunch of materials at goodwill or yard sales. I got most of mine from Joann and Michael's with many coupons! Every time I go in my room I get excited when I see it. It is still a work in progress but I have a majority of it done. I got the idea to start a blog after I had made most of the L's. Go figure!! I am looking all over pintrest for more ideas. I made a couple tutorials for some of the L's. I will have a picture that is numbered, so you can check them out!! I am also excited to share updates as the wall grows. Some of them are pretty crooked. I can't hang anything on the wall straight!! 


1. Here
2. Here
3. Here
4. Here
5. Here


Sunday, September 1, 2013

Painted and Stained Desk

I painted my walls dark grey this past Christmas. I love the color but all my furniture in my room is dark. Now my room feels so dark and blah!! It needs some color! I love mint green right now and thought it would be a great way to add some color to my room. I am so happy with the outcome of this project. Granted it took about 4 days total, but it was well worth it!


Thing you will need:
Desk 
Paint (Gildden in Minty Green Flat from Walmart)
Sand paper (I used 80 Grit then 120 Grit) 
Stain (Special Walnut 224)
Foam Brush
Paint brush

Step 1: Sanding! I hated this step. I hate sanding in general but the fact that it was 100 degrees and very humid really didn't help! Once I finished sanding, I took a couple of wet paper towels and wiped down the desk a few times. Just to get all the dust off of it. 


Step 2: The front of my desk has a pull out drawer and the front will fold down. When I got the desk I loved this feature, but it has been worn out and the front wont stay up. So I got my dad to put a screw on each side of the drawer. 

Step 3: Painting! I am in love with mint green at the moment and I thought it would go good with the grey walls. I used Gildden flat paint from Walmart. I was kinda nervous about using this paint because I have have never used this brand before. I liked it a lot. Low odor and only had to use 2 coats. I will definitely use it again. **Money saving tip. If your not painting a huge piece of furniture, you can get a paint sample at Lowes for like 5 dollars and that should be enough. I got a quart of paint for about 14 dollars and didn't put a dent in it. 

Step 4: Staining the top. I did two coats total of the stain. This is what took the longest. The stain took forever to dry! 

Step 5: I put two coats polycrylic protective finish just on the top. I didn't want it to look too glossy and it turned out just how I wanted. 


Before: 

After: 


Saturday, August 31, 2013

DIY Marquee Letter

I love vintage marquee letters and I have wanted one for a long time now. I don't have the money to buy an authentic one right now. I will one day though!! So I made my own marquee letter. It was super easy to make. This project is one that I almost gave up on! I bought this spray paint and thought it would work. Soon to realize it was going to blend in with my dark grey walls. I should have just tested the paint first to see but I didn't! I have some green spray paint left over from a previous project and thought I would give green a try. I went back inside to work on some other things and about 15 minutes later I went to check on it. It was floating in the pool. :( Lesson learned!! Do not spray paint anywhere near a pool on a windy day! I ended up not liking the color, it didn't look bad but it didn't match the image in my head :( So I tried the spray paint that I had originally purchased and I loved it. It kinda blends in with my walls but I don't care! I really like the way it turned out!! 

Things you will need:
 *I was so excited to start this projects I forgot to take a picture of everything a the beginning!! Oops!
Paper mache letter (Joann)
Rust-Oleum Satin Metallics spray paint (walmart)
X-acto Knife
Globe String Lights (target)
Packing tape


Step 1: Cut off the top of your paper mache letter. You can always use the top piece for another project. 


Step 2: Spray paint a couple of coats on your letter. I did 2 coats. Let it completely dry.

Step 3: I took the bulbs out of all of my string lights because they were getting tangled and I did not want the glass bulbs to break. You don't have to do that step, but it helped me. Now this step I just eye balled. I took two bulbs and held them in the letter and got them lined up how I wanted. Then I took a pen and put a little dot right under the bulb. If you have an easier way of doing this process, do it!! *Make sure when you take the bulbs out, you take them off at the end you do not plug it in at!!


Step 4: Take your x-acto knife and put an X right though the dot. You may have to adjust the size a little. Then I used a pen and pushed it through the X to open it up.


Step 5: Place the all the light bulbs in the holes and take the string of lights and start attaching the bulbs. I didn't attach the rest of the lights. I have those for back up now!

Step 6: Plug in your lights to make sure all the bulbs are lit up. Now unplug your lights and turn your letter over and try to tape down the wires. Mine just did what they wanted!!


*looks a little better right?!

The tricky part is hanging it on the wall. I hot glued some fishing string to the back and put a long nail in the wall. There is probably an easier step to this!!


Sunday, August 11, 2013

DIY Burlap Wreath


I have seen these burlap wreaths all over Pintrest, and I finally decided that it was time to make one. I am the person who has a wreath or something on their front door year round. I needed a fall wreath. Not really but I really wanted to make this wreath!! I love the way it turned out. Getting the chevron to line up was a hard task all on its own! I love chevron but it can very difficult to recreate!


What you will need:
18" Wire wreath  
White paint
blue paint  (I didn't really care for the blue so i changed to red!)
Letter 
x-acto knife
Burlap Roll (Michael's) 
Hot Glue


1. I could not find a wood letter that I liked so I bought a paper mache T and cut the top off. 
You can use the other part for another craft! Paint the whole letter white. I used the color Snow (Titanium) White, and did a total of three coats.


2. This part is very tricky! Getting the chevron template on your letter is harder than it looks. I tried many different methods and they all did not work for me. You probably can see all the eraser marks! I ended up using the square method. I just followed the steps here and was able to make it work! 


3. Paint every other stripe red. I used the color Cardinal Red, and did about three coats on mine. Then I went and touched up with the white paint.


4. Burlap time!! Take your burlap roll and weave it through the wires to told it in place. You want the rest of your burlap to be under your wreath. Now take the burlap and push it through the wires creating a little bubble. Keep doing this through every wire and push them close together so none of the wire shows through. 


* I wanted my loops to be kinda big and I ran out of burlap!! Thankfully I had some extra left over from a previous project. If you don't want the loops as big you might be able to use just one roll. Also if your wreath is smaller you will be fine. If you want your loops big, buy an extra roll! To connect the burlap all you have to do is weave the end piece through the wires like at the beginning.

5. At the end of the wreath I left about a 4 to 6 inch piece of excess and just tucked it in to create another loop.


6. Lastly, attach your letter. I forgot to take a picture of the hot glue at the beginning. oops! If your using a paper mache letter or even cardboard then the hot glue will work. If your using a wood letter or something that has a little weight to it, then the hot glue might not work. If it is too heavy your letter could pull your loops out of your wreath! 

* I attached a small piece of fishing line to mine because the nail on my door is too high!